Logo Design 2


1)The first thing I did to help bring my sketch to life was by using the Ellipse tool. This was quick and easy using the shift button so it was a perfect circle.

2)Next I made a slanted line so that I could place my skyline on. I used the pen tool to do this. Making this have a differing point so that the buildings can look more compacted in together.

3)This shot shows the buildings beginning to come together. I used the pen tool (P) for this. Most of these buildings were square so they were easy to make but one had a rounded top to the building which meant I have hold down when using the pen tool to create this effect.

4)Then I carried on with the building of the sky line. Once I had finished this I made sure that it said right in the circle.

5)In this screenshot you can see that I have selected all of my work. Then I when into the pathfinder tab and clicked on the divid option, this was so that I could lean up my line work and make sure there was no extra lines on that would be getting in the way.

6)This shot shows the skyline after I have changed the stroke size to 1pt in stem of 0.25pt which it usually is.

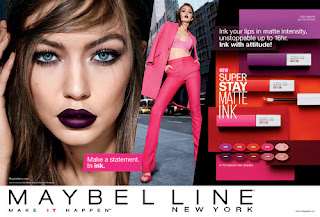
7)Now that the line work was done I wanted add in the brand name. This took me awhile to figure out as I wasn't sure how to place the words butter awhile I put them underneath the skyline separating the Maybellien and the New York.

8)Then I wanted to add in the river which I drew in on my sketch. To do this I went around the bottom half of the circle with the pen tool, then turning the fill a light blue to create the better understanding of the river.

9)One of the last steps was to add in detail into the river, so I decided to play around with the brain brush tool creating watercolour lines to find what was best then adding it onto my river section.


1)The next logo that I wanted to work on was also going to be based around the city skyline. This time I traced around the the top part of the cities skyline with the pen tool. When I was done I elected it and moved it over to another part of the page.

2)All that was left to do was add in the name logo. I used the same font as before but this time made it a lot bigger and made the New York in the middle so that it was entered with the rest of the logo.

1)The next logo I worked on was very similar to the first one as I copied and pasted the open over but decided to keep the simple structure only.

2)What I did next was add in the long lines that I added onto two of the buildings. This helped me when adding in the name logo. As I was able to slot it into the gap.

3)In this last shot I show you that for my coloured version of this I made the fill of the circle as grey and was using the colour sheet to eyedrops the colours onto the buildings. I did this buying the I commend to make this quicker.
Comments
Post a Comment